Windows 10 End of Support: 4 Paths Forward After 14-10-2025 including buy AI-PC

Windows 10 End of Support: What Are Your Options After October 2025?

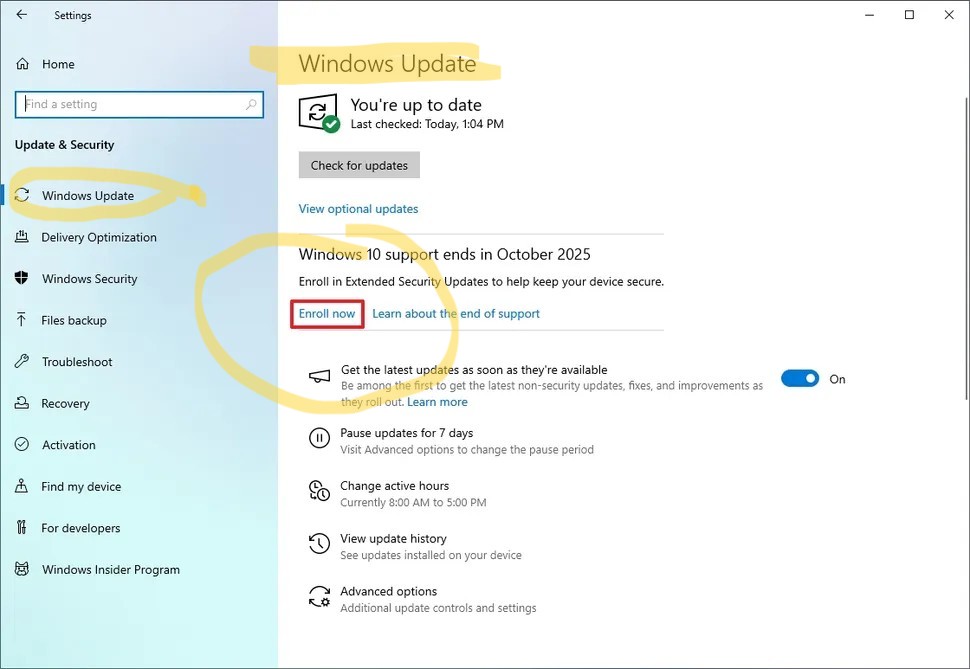
Microsoft has set the official end date for Windows 10 support: October 14, 2025. After that day, no more free security updates or bug fixes will be released. For millions of PCs still running Windows 10, this raises an urgent question: what’s next?

The good news is you have several paths forward. Each has its pros and cons, and the right choice depends on your budget, your hardware, and how long you plan to keep your current setup. Let’s break down the four main options.


1. Do Nothing – Stay on Windows 10 Without Updates

You could technically keep using Windows 10 exactly as it is. But be warned: this comes with serious risks.

  • Your system won’t receive security patches, leaving it increasingly vulnerable to malware, ransomware, and other cyberattacks.
  • Compatibility issues may pile up over time as software vendors move on.
  • Online services, banking apps, or even browsers could eventually refuse to work on outdated, insecure systems.

This is the “bury your head in the sand” approach. It might work for a machine that’s completely offline and used for very specific tasks, but for daily use — especially with internet access — it’s the riskiest option.


2. Stay on Windows 10 with Extended Security Updates (ESU)

If you’re not ready to jump ship yet, Microsoft is offering Extended Security Updates (ESU) for Windows 10. This allows you to keep receiving critical security patches after the official end-of-support date.

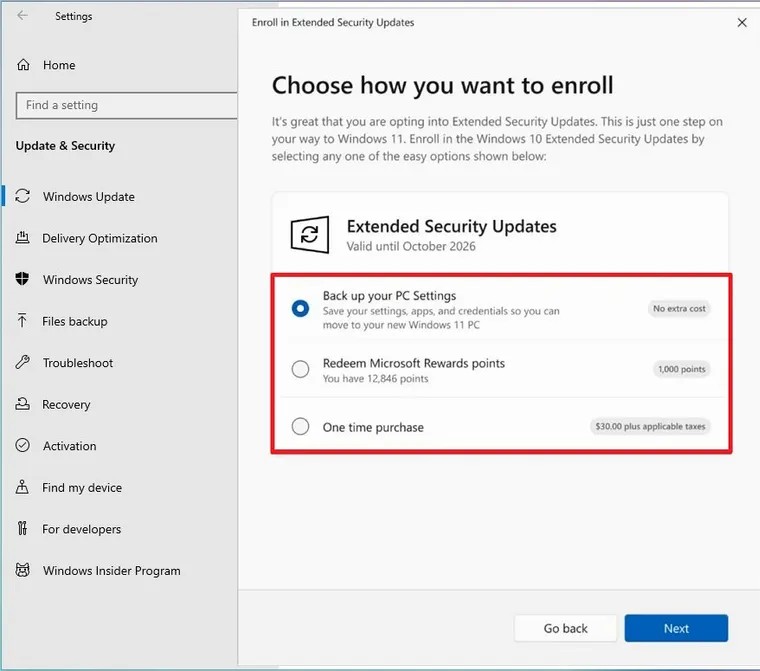
Here’s how you can enroll:

  • Free Option: If you’re backing up your files with OneDrive, you may be eligible for a year of ESU at no extra cost.
  • Rewards Option: Redeem Microsoft Rewards points (1,000 points per device) to extend security updates.
  • Paid Option: Purchase ESU directly for a modest one-time fee (around $30).

ESU gives you more breathing room — up to a year of continued protection — but it’s not permanent. Eventually, updates will stop, so treat this as a temporary solution while you prepare for the future.

>>>>


3. Buy a New PC – AI PC vs. Non-AI PC

For many people, the end of Windows 10 support will also be a chance to refresh hardware. If your system is more than five years old, buying a new machine could be the smoothest upgrade path.

Here’s the key decision today: AI PC or non-AI PC?

  • AI PC: These new devices include specialized AI hardware (like NPUs – Neural Processing Units). They’re designed to accelerate on-device AI tasks such as voice recognition, video editing, productivity tools, and next-gen Windows features. If you want to stay future-proof and plan on keeping your computer for several years, an AI PC is the smarter investment.
  • Non-AI PC: Traditional PCs without NPUs are still powerful and may be cheaper. If you mainly use your computer for browsing, office work, and standard apps, you may not need AI hardware — at least not yet.

Think of this as a fork in the road: AI PCs are where the industry is heading, but whether you need one today depends on your workload and budget.


4. Upgrade Your Current PC to Windows 11

If your PC meets the requirements for Windows 11, upgrading may be the easiest and cheapest option. Windows 11 will be supported until at least 2031, giving you years of updates and access to new features.

Pros:

  • No new hardware needed if your current PC is compatible.
  • Continued security patches and support for the long term.
  • Access to modern Windows features and optimizations.

Cons:

  • Not all older PCs meet the official hardware requirements.
  • Some people may find the new interface and layout take getting used to.

If your PC is already fairly recent, this is likely the most straightforward path.


Final Thoughts

The end of Windows 10 support isn’t the end of the world — but it does mean making a decision.

  • If you’re running an old machine for offline tasks, you might risk staying put.
  • If you need a little more time, ESU buys you a temporary extension.
  • If you’re due for new hardware, now’s the perfect time to consider whether an AI-powered PC makes sense.
  • And if your current machine is eligible, upgrading to Windows 11 is the simplest way to keep receiving support well into the next decade.

The key is not to wait until October 2025. Start planning now, and you’ll avoid a rushed, stressful transition later.


Disclosure: As an Amazon Associate, I earn from qualifying purchases, at no extra cost to you.

Note: Some Amazon links on this page may redirect you to your local Amazon store automatically, depending on your location. This ensures you see the correct products, pricing, and shipping options for your region.


💻 AI-Powered PCs (Future-Proof Choice)

🖥️ Windows 11 Ready (Non-AI PCs)

💰 Budget-Friendly Windows 11 PCs


HOW-TO RESET WINDOWS PASSWORD | Hirens-BootCD

I think this the easiest method to reset password in Windows 10/11.


You need to know the shortcut to go to Boot Menu to choose the CD or USB with Hirens-BootCD created with.

To reset a forgotten Windows 11 password using Hiren’s BootCD PE, follow these steps. This method works for both local and Microsoft accounts.

Instructions How-To create bootable media see further below at the end.


  • Boot your computer with Hiren’s BootCD PE — DVD/Optical Disk or USB
  • Go to Start Menu -> Security -> Passwords -> NT Password Edit
  • Open your SAM file (It is usually located in C:\Windows\System32\config\SAM)
  • Click your username and the click ‘Change password’. To set a password, type your password both ‘New password’ and ‘Verify’ fields and then click to ‘OK’. To remove the password, leave both ‘New password’ and ‘Verify’ fields blank and then click to ‘OK’.


🔧 What You’ll Need

  • A USB flash drive (at least 8 GB)​ or a DVD-R/-RW/DL
  • Access to another working PC to create the bootable USB​
  • The latest Hiren’s BootCD PE ISO file​
  • Rufus (a tool to create bootable USB drives) ​ Or DVD Burner Software & DVD Burner Drive – e.g. Ashampoo Burning Studio FREE

🛠️ Step-by-Step Guide

1. Download Hiren’s BootCD PE

  • Visit the official site: hirensbootcd.org
  • Download the latest ISO file (e.g., HBCD_PE_x64.iso)​

2. Create a Bootable USB with Rufus

  • Download Rufus from rufus.ie
  • Insert your USB drive into the working PC​
  • Open Rufus and select your USB under “Device”​
  • Under “Boot selection,” choose the Hiren’s ISO file​
  • Click “Start” and wait for the process to complete​

3. Create a Bootable DVD DISK with Ashampoo Burning Studio

  • Download Ashampoo Burning Studio FREE from https://www.ashampoo.com
  • Insert your DVD Disk in the DVD RW drive into the working PC​
  • Open Ashampoo and select your Disk Image > ​Burn Image
  • Under “Disc Image Path” choose the Hiren’s ISO file​
  • Click “Next” after choose your Burner DVD-RW/-R Drive and “Write” and wait for the process to complete​

4. To boot to the Boot Menu

(also known as the One-Time Boot Menu) — without entering BIOS Setup or changing permanent boot order — you need to press a specific key at startup for your PC brand. Here’s a list of common brands and their Boot Menu keys:

Boot Menu Keys by Manufacturer (for one-time boot device selection)

Brand Boot Menu Key Notes
Dell F12 Tap during POST (when Dell logo shows).
Lenovo F12 or Fn + F12 Some models use the Novo Button (small pinhole button).
HP Esc → F9 First press Esc, then F9 for Boot Menu.
ASUS F8 Sometimes Esc is used instead.
Acer F12 May require enabling F12 Boot Menu in BIOS first.
MSI F11 Tap at splash screen.
Gigabyte F12 Standard across motherboards.
ASRock F11 Tap during splash screen.
Microsoft Surface Volume Down + Power Hold Volume Down, press Power, release when logo appears.
Samsung Esc or F12 Depends on model.
Toshiba F12 Tap at startup.
Sony VAIO Assist or F11 Newer models have a physical “Assist” button.

💡 Tips:

  • Press the Boot Menu key immediately after turning on the PC — start tapping it every second.
  • If you see the OS loading, you missed the timing — restart and try again.
  • On laptops with Fn Lock, you may need to hold Fn along with the function key (e.g., Fn + F12).

===

How Do You Know If Your PC Supports Windows 11 24H2, Requires a Bypass, or Does Not Support It at All?


For Windows 23H2 go here. For 24H2 Continue.

For the fastest answer: If the PC does Not support at all, then should appear the image in the end of this article. At the end also there are offers for buying a new Intel/AMD AI Mini-PC 3% off + No import Tax pay in the EEA/EU.

https://www.slideshare.net/slideshow/how-do-you-know-your-pc-supports-windows-11-24h2-or-windows-11-24h2-bypass-or-not-at-all-support/272970967

YouTube Video


How Do You Know If Your PC Supports Windows 11 24H2:

  1. YES OK Normal upgrade,
  2. Requires a Bypass, or
  3. Does Not Support It at All – Supports bypass till 23H2

The upcoming Windows 11 24H2 update promises new features and optimizations, but not every PC will be able to install it. If you’re wondering whether your PC supports this update, needs a bypass, or simply won’t work with it, you’re not alone! In this article, we’ll guide you through the process of determining your PC’s compatibility with Windows 11 24H2, and what to do if it’s not fully supported.


1. What’s New in Windows 11 24H2?

Before diving into compatibility, let’s quickly cover why this update is important. Windows 11 24H2 is the next significant feature update after Windows 11 23H2. It brings a slew of enhancements to the user interface, security improvements, and new features aimed at improving productivity. While this update is exciting, Microsoft has strict system requirements, which could leave many older PCs behind.


2. Understanding the Basic Requirements for Windows 11 24H2

Let’s start with the basics. If your PC meets these minimum requirements, you’ll have no problem upgrading to Windows 11 24H2:

  • Processor: Intel 8th-gen (2017) or newer (or equivalent AMD Ryzen processors)
  • TPM (Trusted Platform Module): TPM 2.0 required for security
  • Secure Boot: Your PC’s BIOS/UEFI must have Secure Boot enabled
  • RAM & Storage: 4GB RAM minimum and at least 64GB of storage

If your PC was built after 2017 and has an Intel 8th-gen processor (or newer), then you’re in luck! Your system likely supports Windows 11 24H2 with no special tricks needed. Simply check for updates, and the in-place upgrade should run smoothly.

How to Check Compatibility

The easiest way to see if your PC can run Windows 11 24H2 is to check for updates in your system settings. If your PC is supported, Windows will allow you to download and install the update right away.

  • Navigate to Settings > Update & Security > Windows Update
  • Check for updates and see if Windows 11 24H2 is available

If the update starts installing, congrats! Your PC is fully compatible.


3. What If Your PC Is Not Fully Supported? (The Bypass Route)

But what if your PC doesn’t meet all the requirements? If your machine is from 2010 or newer, but it’s showing messages like “The processor isn’t supported” or “TPM 2.0 is missing,” you may still be able to install Windows 11 24H2 with a few tricks.

Common Compatibility Issues

Here are the typical reasons why your PC might be considered “not supported”:

  • Lack of TPM 2.0: Some older systems don’t have the required TPM 2.0 module. TPM 2.0 is critical for security in Windows 11, but some systems only have TPM 1.2 or none at all.
  • Missing Secure Boot: Secure Boot is another security feature that some older BIOS/UEFI setups don’t support or don’t have enabled.
  • Processor Incompatibility: If your processor is older than an 8th-gen Intel or its equivalent from AMD, Windows 11 might block the update because your CPU doesn’t support key features like SSE4.2 or PopCnt.

The Bypass Method

For those who still want to update, there are bypass methods to get around these restrictions. The easiest way is to use a tool like Rufus 4.6+, which allows you to create a bootable USB that skips the TPM, Secure Boot, and processor checks.

Here’s how you can bypass these requirements using Rufus:

  1. Download Rufus from the official website.
  2. Download the Windows 11 24H2 ISO file from Microsoft’s website.
  3. Open Rufus and select your USB drive.
  4. Choose the Windows 11 24H2 ISO, and make sure you check the option to bypass Unsupported Processor, TPM 2.0 and Secure Boot.
  5. Boot your PC from the USB drive and install Windows 11 24H2. If you already have Windows 11 23H2 or 22H2 or Windows 10 22H2 … insert the USB (Windows 11 24H2) created with Rufus and run… the setup.exe and follow along to upgrade to 24H2.

While this method will allow you to install Windows 11 24H2, it’s important to note that some features (especially security-related ones) may not work as intended on older systems.


4. When Your PC Won’t Support Windows 11 24H2 – Even with a Bypass

Now, let’s talk about the worst-case scenario: PCs built before 2010. These older systems often lack critical hardware support for features that Windows 11 relies on, and even bypass methods won’t work. For instance, some older processors don’t support key instructions like SSE4.2 (a multimedia instruction set) or PopCnt (a feature required for certain modern apps to function properly).

If your system shows any of these 2 messages during an upgrade attempt, it’s a sign that Windows 11 24H2 simply isn’t going to run:

  • “This PC’s processor doesn’t support a critical feature (PopCnt).”
  • “This PC’s processor doesn’t support SSE4.2.”

In these cases, even Rufus won’t be able to bypass these hardware limitations, and you’ll be stuck with an older version of Windows 11 23H2 (bypass).

What Versions of Windows Will Still Work?

If you’re running a PC from before 2010, the best you can hope for is running earlier versions of Windows 11, like Windows 11 21H2, 22H2, or 23H2, which have looser hardware requirements and can usually be installed using a bypass method.

However, Windows 11 24H2 is officially out of reach for these systems, as the performance and security risks would be too great without the necessary hardware support.


5. How to Perform an In-Place Upgrade to Check for Compatibility

The best way to find out if your PC supports Windows 11 24H2 is to try performing an in-place upgrade. Here’s how:

  1. Open Settings on your Windows 10 or older Windows 11 system.
  2. Go to Update & Security > Windows Update.
  3. Check for updates.
  4. If your PC is compatible, the Windows 11 24H2 update will be listed, and you can install it.
  5. If your PC isn’t supported, you’ll see specific messages explaining why—these could include missing TPM 2.0, Secure Boot, or an unsupported processor.
  6. In case Failure upgrade from Settings, … Then try from a USB stick bootable Windows 24H2 bypass created using Rufus 4.6+ … run setup.exe.
  7. This will give you a clear indication of whether you can upgrade smoothly, whether a bypass is required, or if your PC just isn’t going to support this version of Windows.

6. Conclusion: Know Your PC’s Limits and Options

To summarize, here are the three scenarios:

  • Case 1: If you have a system with an Intel 8th-gen processor or newer, you’re good to go! Windows 11 24H2 will install without issue.
  • Case 2: For PCs from 2010 to 2017, you may encounter compatibility issues with TPM 2.0, Secure Boot, or processor support, but these can often be bypassed using tools like Rufus.
  • Case 3: If your PC was built before 2010, Windows 11 24H2 is out of reach. You can still run earlier versions of Windows 11 23H2 using a bypass, but 24H2 isn’t supported—even with workarounds.

Ultimately, upgrading to Windows 11 24H2 offers great new features, but not every system will be able to take advantage of it. Use the steps outlined above to check your system’s compatibility, and if needed, employ bypass methods to keep your PC running the latest software for as long as possible.

If your PC can’t support Windows 11 24H2, it might be time to consider upgrading your hardware. Staying current is crucial not only for new features but also for ongoing security updates. Thanks for reading, and happy upgrading!

Some special offers of upgrading to newest hardware are the following:

Mini-PC – https://minixpc.com/?ref=off003 — Off 3% [Coupon: off003] plus No Import TAX shipping to the EEA/EU countries.  

Important Notes:

  1. An alternative way to upgrade is rather than run from Rufus 4.6+ USB Windows 11 24H2 the setup.exe to go to CLI/TERMINAL AS ADMIN And run:
    G:
    cd G:\sources
    setupprep.exe /product server

    [where G:/ is the drive letter of the Rufus 4.6+ USB drive]
    This should Start the upgrade process to 24H2.
  2. Windows 11 upgrade in-place and with keep Files & Apps will work only if language of PC Windows 11 e.g. English USA, the same as language e.g. English USA of the ISO Download Windows 11 from Microsoft website.

Basically the message if unsupported completely should be these 5 issues:

Notes: If the first 2 shown by red arrows – are present, then PC can go till 23H2 bypass. Is too old for Windows 11 24H2 (bypass).