Windows 10 End of Support: What Are Your Options After October 2025?
Microsoft has set the official end date for Windows 10 support: October 14, 2025. After that day, no more free security updates or bug fixes will be released. For millions of PCs still running Windows 10, this raises an urgent question: what’s next?
The good news is you have several paths forward. Each has its pros and cons, and the right choice depends on your budget, your hardware, and how long you plan to keep your current setup. Let’s break down the four main options.
1. Do Nothing – Stay on Windows 10 Without Updates
You could technically keep using Windows 10 exactly as it is. But be warned: this comes with serious risks.
- Your system won’t receive security patches, leaving it increasingly vulnerable to malware, ransomware, and other cyberattacks.
- Compatibility issues may pile up over time as software vendors move on.
- Online services, banking apps, or even browsers could eventually refuse to work on outdated, insecure systems.
This is the “bury your head in the sand” approach. It might work for a machine that’s completely offline and used for very specific tasks, but for daily use — especially with internet access — it’s the riskiest option.
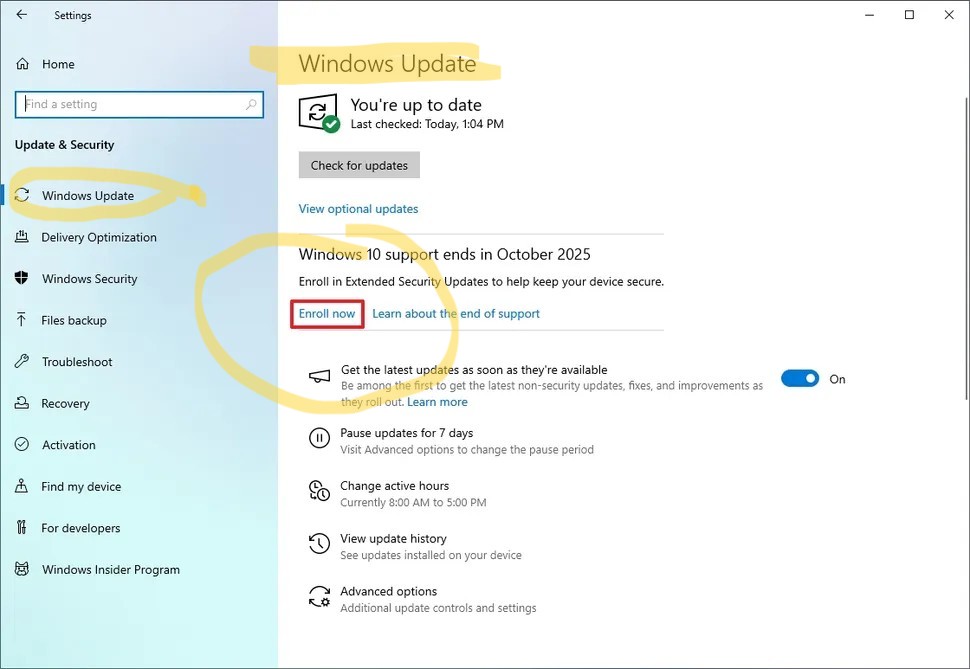
2. Stay on Windows 10 with Extended Security Updates (ESU)
If you’re not ready to jump ship yet, Microsoft is offering Extended Security Updates (ESU) for Windows 10. This allows you to keep receiving critical security patches after the official end-of-support date.
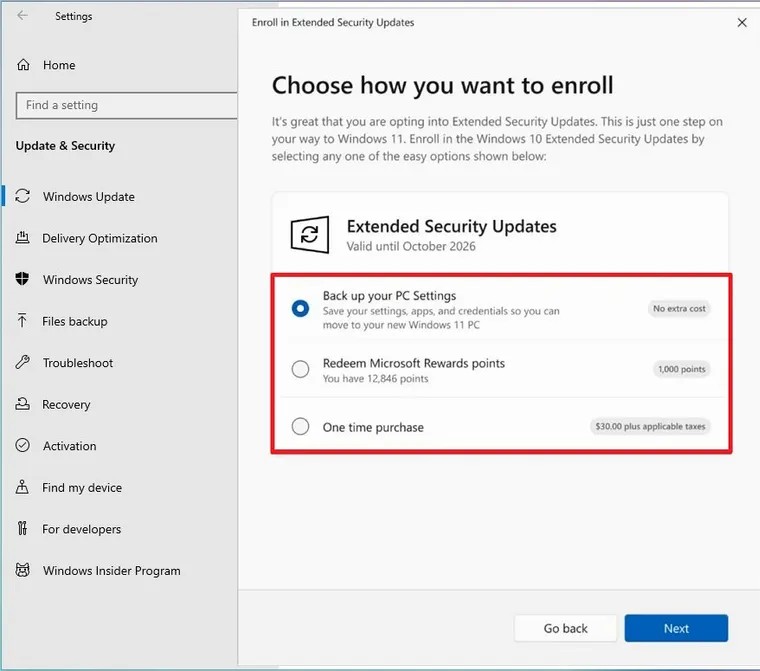
Here’s how you can enroll:
- Free Option: If you’re backing up your files with OneDrive, you may be eligible for a year of ESU at no extra cost.
- Rewards Option: Redeem Microsoft Rewards points (1,000 points per device) to extend security updates.
- Paid Option: Purchase ESU directly for a modest one-time fee (around $30).
ESU gives you more breathing room — up to a year of continued protection — but it’s not permanent. Eventually, updates will stop, so treat this as a temporary solution while you prepare for the future.
>>>>
3. Buy a New PC – AI PC vs. Non-AI PC
For many people, the end of Windows 10 support will also be a chance to refresh hardware. If your system is more than five years old, buying a new machine could be the smoothest upgrade path.
Here’s the key decision today: AI PC or non-AI PC?
- AI PC: These new devices include specialized AI hardware (like NPUs – Neural Processing Units). They’re designed to accelerate on-device AI tasks such as voice recognition, video editing, productivity tools, and next-gen Windows features. If you want to stay future-proof and plan on keeping your computer for several years, an AI PC is the smarter investment.
- Non-AI PC: Traditional PCs without NPUs are still powerful and may be cheaper. If you mainly use your computer for browsing, office work, and standard apps, you may not need AI hardware — at least not yet.
Think of this as a fork in the road: AI PCs are where the industry is heading, but whether you need one today depends on your workload and budget.
4. Upgrade Your Current PC to Windows 11
If your PC meets the requirements for Windows 11, upgrading may be the easiest and cheapest option. Windows 11 will be supported until at least 2031, giving you years of updates and access to new features.
Pros:
- No new hardware needed if your current PC is compatible.
- Continued security patches and support for the long term.
- Access to modern Windows features and optimizations.
Cons:
- Not all older PCs meet the official hardware requirements.
- Some people may find the new interface and layout take getting used to.
If your PC is already fairly recent, this is likely the most straightforward path.
Final Thoughts
The end of Windows 10 support isn’t the end of the world — but it does mean making a decision.
- If you’re running an old machine for offline tasks, you might risk staying put.
- If you need a little more time, ESU buys you a temporary extension.
- If you’re due for new hardware, now’s the perfect time to consider whether an AI-powered PC makes sense.
- And if your current machine is eligible, upgrading to Windows 11 is the simplest way to keep receiving support well into the next decade.
The key is not to wait until October 2025. Start planning now, and you’ll avoid a rushed, stressful transition later.
Disclosure: As an Amazon Associate, I earn from qualifying purchases, at no extra cost to you.
Note: Some Amazon links on this page may redirect you to your local Amazon store automatically, depending on your location. This ensures you see the correct products, pricing, and shipping options for your region.
💻 AI-Powered PCs (Future-Proof Choice)
- AI Laptop – Everyday Productivity + AI Features
- AI Creator Laptop – For Content Creators & Power Users
- AI Desktop – High Performance for Work & Gaming
🖥️ Windows 11 Ready (Non-AI PCs)
💰 Budget-Friendly Windows 11 PCs
GROUP 1 [=Under 500$]
Acer – Aspire 14 AI Copilot+ PC | 14″ WUXGA Display | Intel Core Ultra 5 Processor 226V | NPU: Up to 40 Tops – GPU: Up to 53 Tops | Intel ARC 130V | 16GB LPDDR5X | 512GB SSD | Wi-Fi 6E | A14-52M-51S1
GROUP 2 [=Under 1000$]
Acer – Aspire 16 AI (A16-61M-R98E) AI Laptop, Copilot+ PC, 50 Tops, 16 Inch WUXGA IPS 120Hz Display, AMD Ryzen AI 5 330, 16 GB RAM, 512 GB SSD, AMD Radeon 820M, Windows 11, QWERTZ Keyboard, Grey
Acer – Aspire 16 AI (A16-11M-X1CW) AI Laptop, Copilot+ PC, 16 Inch WUXGA IPS 120Hz Display, Qualcomm Snapdragon X X1-26-100, 16GB RAM, 512GB SSD, Qualcomm Adreno GPU, Windows 11, QWERTZ Layout
HP OmniBook X Flip 2-in-1 Next Gen AI Laptop | Intel Ultra 5-226V (8C) | Dedicated NPU for AI | 40 NPU Tops | Copilot+ PC | 14 Inch WUXGA 1920×1200 Touchscreen | 16GB | 512GB SSD | Win11 | QWERTZ |
Lenovo IdeaPad 5 2-in-1 AI Laptop, Copilot+ PC, 14 Inch WUXGA Touch Display, AMD Ryzen AI 5 340, 16GB RAM, 512GB SSD, AMD Radeon Graphics, Win11, QWERTZ, Luna Grey, 3 Months Premium Care
Lenovo IdeaPad Slim 3i Laptop | 14 Inch WUXGA Display | Intel Core i5 13420H | 16GB RAM | 512GB SSD | Intel UHD Graphics | Win11 | QWERTZ | Luna Grey | 3 Months Premium Care
Note: Amazon purchase Links Updated 31 March 2026

